Shopify SMS.
Five flows, made simple
Connect with customers at every stage.
Follow the steps to set up, test and launch your messaging flows.
YOUR MESSAGING FLOWS
Your five messaging flows
Open Kudosity's Shopify SMS Integration from Apps in Shopify Admin.
Select a flow, then open Configure or Settings. Repeat & Replenishment contains its own product or collection flows.
A quick check before you start
Connect your Messaging Account and check your available credit.
Confirm that a sender is available. Use a Sender ID Override where the flow offers one.
Prepare templates and your own mobile number for testing.
Check SMS consent and recipient eligibility for marketing messages.
Abandoned Cart
Send reminders that bring your customers back to their checkout.
Reminder sequence
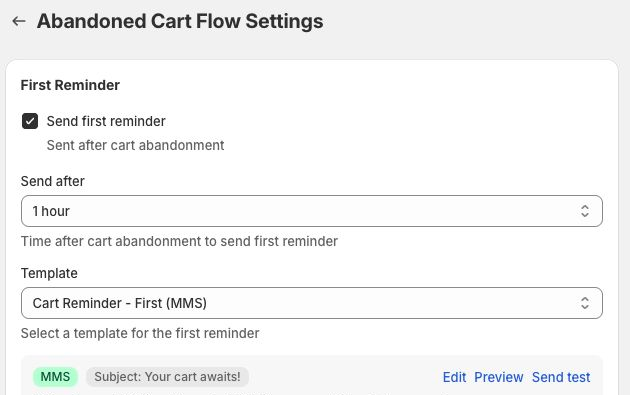
Abandoned Cart settings: First reminder and second reminder
Enable the first reminder
Select Send first reminder. Choose a delay of 30 minutes, 1 hour, 2 hours or 4 hours.Choose the message template
Select a template. Use Edit to adapt the wording, Preview to check it and Send test to inspect delivery.Add a second reminder
Scroll to Second Reminder. Enable it, select its template and choose the delay after the first reminder.
Keep the checkout-link placeholder in your message so customers can return to their checkout.
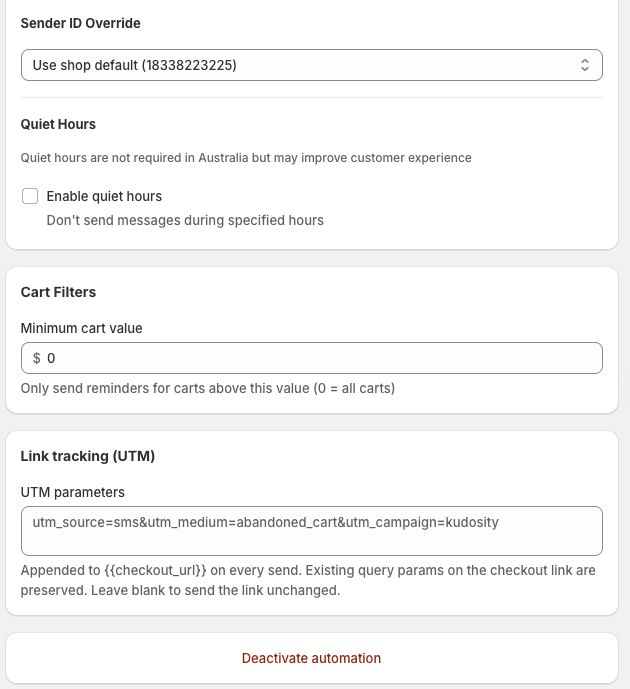
Delivery settings
Continue below the reminder templates
Choose your sender
Use the shop default or select a Sender ID Override.Set quiet hours and cart value
Set quiet-hour start and end times if required. Minimum cart value of 0 includes all cartsAdd optional tracking
Enter UTM parameters if you use them for reporting. The app adds them to the checkout link.Save and activate
Test both enabled messages, save your settings and activate the flow when ready.
An active flow shows Deactivate automation. Use it when you need to pause the flow.
Order Notifications
Send order confirmations and shipping updates.
Order and shipping messages
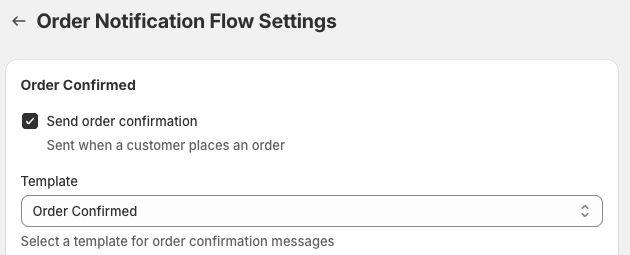
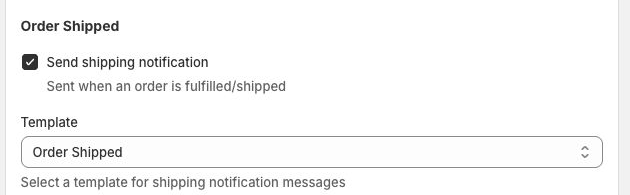
Order Notifications settings
Enable order confirmation
Select Send order confirmation and choose the template to send when a customer places an order.
Enable shipping notification
Select Send shipping notification and choose the template for fulfilled or shipped orders.
Review both messages
Preview and test names, order numbers and links. Choose your sender and optional UTM parameters below.
Save and activate
Save your settings. Activate the flow and check Recent Activity after a qualifying order or fulfilment.
Post Purchase
Set up the new-customer welcome offer and follow-up.
Welcome offer
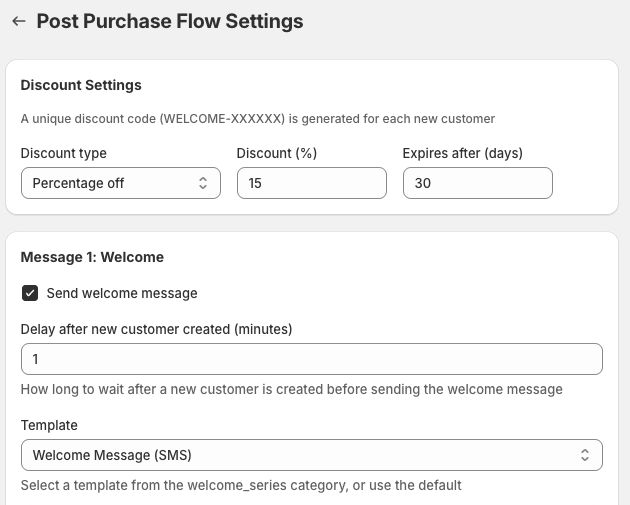
Post Purchase settings: Discount Settings and Message 1
Set your discount
Choose a percentage or fixed amount and set Expires after (days). The flow generates a unique WELCOME code for each new customer.
Enable the welcome message
Select Send welcome message. Enter Delay after new customer created (minutes), then choose a template.
Review your message
Check that the copy matches a new-customer welcome. Include the offer and relevant link if you want to promote the discount.
This flow starts when a customer with SMS consent is added to your store. Its navigation label is Post Purchase.
Welcome follow-up
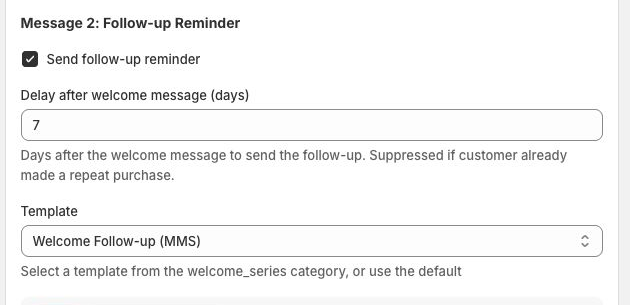
Post Purchase settings: Message 2
Enable the reminder
Select Send follow-up reminder. Enter Delay after welcome message (days), then choose a template.
Check the discount timing
Schedule the follow-up before the discount expires. Check that the message contains the correct offer and link.
Finish your settings
Choose a Sender ID Override or use the shop default. Set quiet hours if required, test each message, then save and activate.
The flow suppresses the follow-up if the customer has already made a repeat purchase.
Repeat & Replenishment
Bring customers back with product or collection reminders.
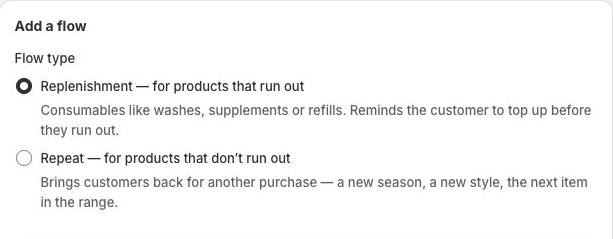
Choose your flow type
Open Repeat & Replenishment > Configure > Add a flow
Choose Replenishment
Use this for consumables that run out, such as supplements, washes or refills.
Choose Repeat
Use this to encourage another purchase, such as a new style or the next item in a range.
Plan the buying cycle
Create a separate flow for each product or collection that needs its own reminder timing.
Both types use a qualifying purchase as the trigger. Select the type that matches the reason to buy again.
Set the trigger and timing
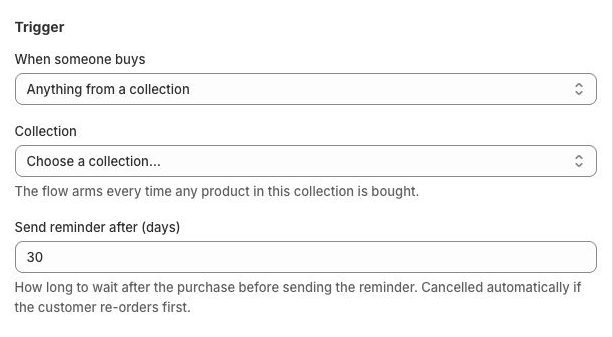
Repeat & Replenishment settings: Trigger
Choose what starts the flow
Under When someone buys, select A specific product or Anything from a collection.
Select your product or collection
Choose the item to watch. A collection flow starts when any product in that collection is bought.
Set the reminder delay
Enter Send reminder after (days). Choose a delay that matches the expected buying or replenishment cycle.
A re-order before the reminder is due cancels it. Every qualifying purchase restarts the timer.
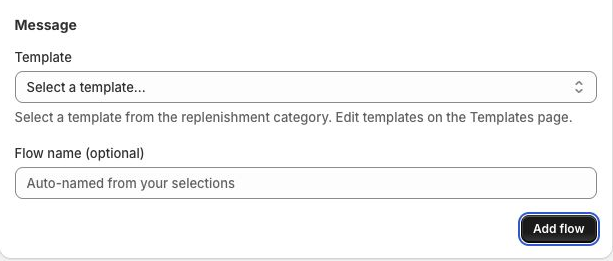
Choose the message
Repeat & Replenishment settings: Message
Select a template
Choose a template from the replenishment category. Edit the wording on the Templates page.
Name and add your flow
Enter an optional Flow name, or let the app name it from your selections. Select Add flow when ready.
Review and manage the flow
Under Your flows, use the more-actions menu to Preview message. Pause a flow when needed; Resume flow restarts it.
Review the template and timing before adding the flow. Pausing keeps the flow’s settings.
Understand automatic controls
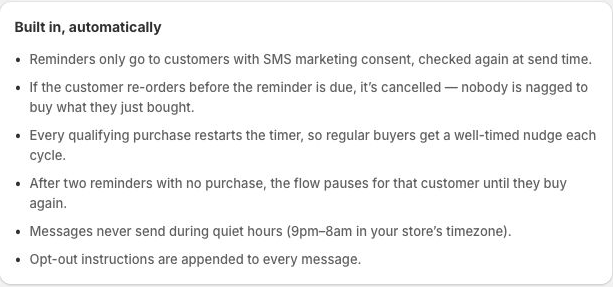
Repeat & Replenishment settings: Built in, automatically
Consent and opt-out
The app checks SMS marketing consent again at send time and appends opt-out instructions to every message.
Re-orders and repeat reminders
A re-order cancels the pending reminder. After two reminders without a purchase, the flow pauses for that customer until they buy again.
Quiet hours and reporting
Messages avoid 9pm–8am in your store’s timezone. Check the flow dashboard and Activity for delivery, re-orders and attributed revenue.
These controls are built in. You do not need to configure separate quiet hours for Repeat & Replenishment.
Birthday
Send a birthday offer, greeting and optional reminders.
Birthday offer and teaser
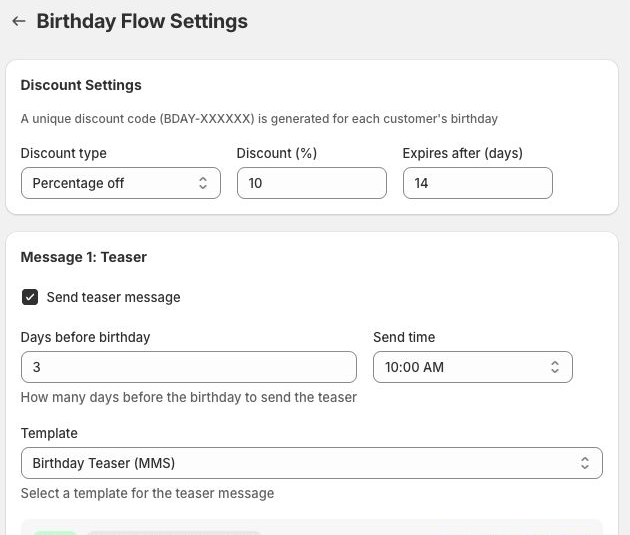
Birthday settings: Discount Settings and Message 1
Choose your offer
Set the discount type, value and expiry period for your birthday offer.
Add an optional teaser
Select Send teaser message. Enter Days before birthday, choose Send time and select a template.
Review the teaser
Preview and test the message. Use the teaser to introduce the upcoming birthday offer.
The flow needs a recorded customer birthday. Complete the birthday collection setup before activating your messages.
Greeting and follow-up
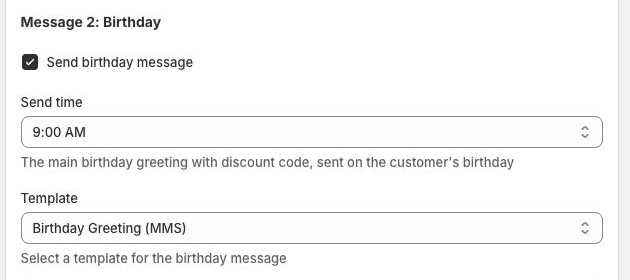
Birthday settings: Messages 2 and 3
Set the birthday greeting
Select Send birthday message. Choose its Send time and template for the main greeting and discount code.
Add an optional follow-up
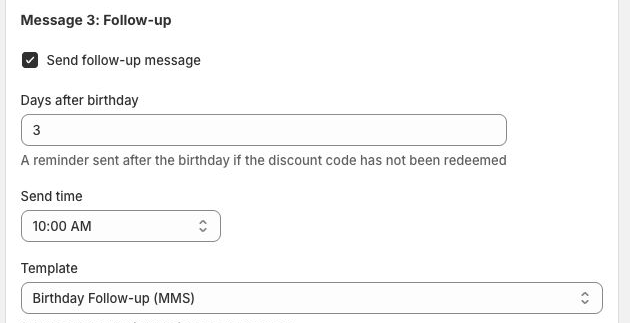
Select Send follow-up message. Enter Days after birthday, choose Send time and select its template.
Check the complete sequence
Keep the follow-up inside the discount validity period. Test every enabled message, select your sender and save.
The follow-up reminds customers about an unredeemed birthday code.
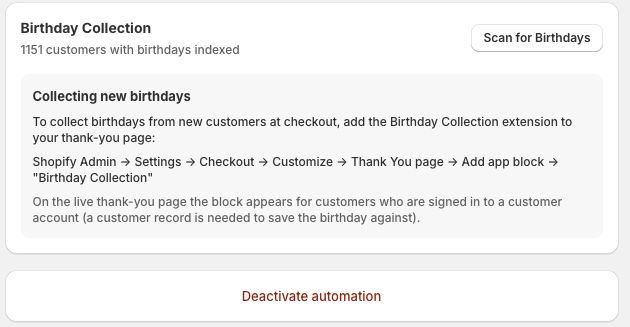
Birthday collection
Birthday settings: Birthday Collection
Scan existing birthday data
Select Scan for Birthdays. Review the result and the number of customers with an indexed birthday.
Add the collection block
In Shopify Admin: Settings > Checkout > Customize > Thank You > Add app block > Birthday Collection. Save your changes.
Verify and activate
Check that a collected birthday is recorded. Activate the Birthday flow once your messages are ready.
The collection block appears for customers signed in to a customer account. It does not fill missing dates for existing customers.
Message testing
Check every enabled message before you activate a flow.
Select Send test beside each enabled template
Review the preview and sender
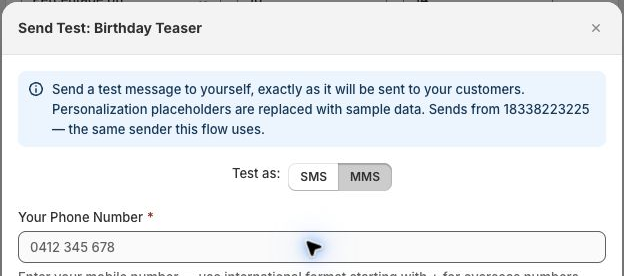
Check wording, links and sender details. Personalisation in the test preview uses sample values.
Enter your own mobile number
Use + for overseas numbers. Choose SMS or MMS where available, then review the estimated cost.
Send the test
Select Send Test SMS or Send Test MMS. Check your phone and amend the template if needed.
Repeat for every message
Test each enabled message in your flow before saving and activating your settings.
Launch and monitor
Save your settings, activate your flow and review what happens next.
A final check for each flow
Save or add your flow
Confirm templates, timing and any offer details. For Repeat & Replenishment, select Add flow when ready.
Activate the flow
Activate when ready. For Repeat & Replenishment, check the status under Your flows.
Review activity
After the first qualifying event, check message activity and any available redemption reporting.
Pause when needed
Select Deactivate automation in flow settings, or pause the individual Repeat & Replenishment flow.
A test message checks content and delivery. A qualifying customer event confirms how the automation runs.
Every enabled message has been tested.
Links and personalisation work as expected.
Reminder timing fits the offer expiry.
The flow has the customer data it needs.
Good messages start with a little guidance.
Need a hand with your Shopify integration?
Resources
:quality(80))
:quality(80))
:quality(80))
:quality(80))
:quality(80))
:quality(80))